
How to Sell Digital Product Licenses with WooCommerce
Written by Ferdous Hassan. Posted in WooCommerce, Elite Licenser, WordPress
Selling a plugin, a theme, or a small app through WooCommerce is simple until the customer has paid. After checkout, the file is in their hands. Without a licensing system, nothing limits how many sites use it, nothing ends access when a term runs out, and nothing changes when the order is refunded. If you want to sell digital product licenses with WooCommerce, you need a way to create a license key for each order, attach rules to it, and check it from inside your product.
This guide shows how to sell digital product licenses with WooCommerce in practical steps. It covers what a license is in a WooCommerce store, why WooCommerce does not manage it on its own, and which setup options exist. It then walks through a full setup with Elite Licenser and its WooCommerce addon, from the first product to the final test order. The guide is written for developers and small teams that sell WordPress plugin licenses, theme licenses, PHP scripts, or desktop and web apps.
A note on scope: “digital product” here means software that can check a license key, such as a WordPress plugin, a theme, or an application. E-books, music, and printable files are digital products too, but they rarely need license keys. For those, the standard WooCommerce download settings are usually enough. Use this guide when you sell digital product licenses for software that needs to be checked after the sale.
What It Means to Sell Digital Product Licenses
A digital product license is a record that gives a customer the right to use your software under set conditions. Digital product licensing is the practice of issuing, checking, and ending those records. The customer receives a license key, a short code that your software sends to a server for checking. The server replies with whether the key is valid, which product it belongs to, when it expires, and how many sites may use it.
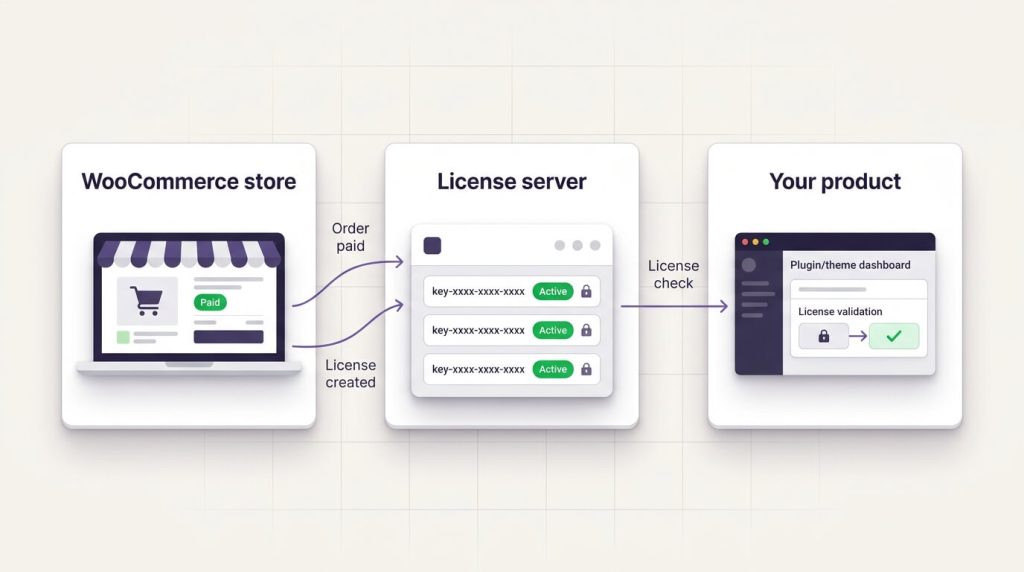
When you sell digital product licenses with WooCommerce, the work is split across three parts:
- The store. WooCommerce takes the order, handles payment, and records refunds and cancellations.
- The license server. This is where keys, expiry dates, site limits, and activation logs are stored.
- The product. Your plugin, theme, or app contains code that sends the key to the license server and acts on the answer.
If one part is missing, the setup does not work. A store without a license server cannot issue keys. A license server that is not connected to the store needs someone to copy keys into orders by hand. A product without check code accepts any key, or no key at all. The aim of a working setup is to generate license keys automatically, so nobody copies codes by hand, and to deliver a license key after payment without waiting for an email from you.
Each license key also carries rules. The most common ones are an expiry date, a support period, a limit on the number of sites, and a status such as active or disabled. These rules separate a license from a plain download link. They also decide how you sell WordPress plugin licenses in practice: a one-site yearly license and a lifetime multi-site license are the same product with different rules. Most sellers limit license activations per domain, so that one purchase does not cover an unlimited number of sites. A WooCommerce license key is the code the customer receives after payment, and the rules behind it live on the license server.
For background, read the Elite Licenser articles on what a license key is and how it works and what software license management is.
Why WooCommerce Alone Does Not Control Digital Product Licensing
WooCommerce supports downloadable products. According to the WooCommerce documentation on virtual and downloadable products, you can attach files to a product, set a download limit, and set a download expiry in days. Orders that contain only products that are both virtual and downloadable skip the Processing status and move directly to Completed.
Those settings control file downloads. They do not control software use. WooCommerce does not generate software license keys by itself, and it cannot check a key from inside your plugin. A licensing extension or custom code has to add that part. This gap is where a WooCommerce license manager comes in. WooCommerce software licensing is a separate layer on top of the store, and it is the main obstacle for stores that sell digital product licenses on top of standard downloads.
What the problem looks like
Stores that rely on downloads alone often show the same patterns. A store should be able to disable a license after a refund without a person doing it by hand, and these patterns show where that does not happen:
- One purchase is shared with friends, clients, or a forum, and the product runs on many sites.
- A customer is refunded, but the plugin keeps working.
- A yearly term ends, and nothing in the product changes.
- Updates are available to anyone who holds the file, not only to paying customers.
- Support staff cannot tell which domains use a given purchase.
Common causes
- No key exists. The only access control is the download link.
- Keys are made by hand. Someone pastes a code from a spreadsheet into an email, so refunds and cancellations depend on memory.
- The product never checks the key. A key exists, but the plugin does not send it anywhere.
- No rules attach to the key. There is no expiry, no site limit, and no status.
- The store and the license server are not connected. A change in the order does not reach the key.
How to check your own store
Before you sell digital product licenses at scale, review the last 90 days of orders. The review does not take long and shows how large the gap is.
- In WooCommerce, filter orders by Refunded, Cancelled, and Failed.
- For each of those orders, check whether a key was ever issued and whether it was disabled.
- Count the paid orders that have a hand-made key, and the ones that have none.
- Read your support tickets for questions about sharing, renewals, or lost keys.
- List which of your products contain any license check code.
The result shows what to fix first. A store with no keys needs the full setup below. A store that issues keys by hand mostly needs a link between orders and licenses, which the WooCommerce license automation guide covers in more detail.
What You Need Before You Sell Digital Product Licenses
Decide the rules before you install anything. A license server applies rules; it does not choose them, and the same is true of any WooCommerce license manager. Write down an answer to each decision below for every product.
Decision | Example options | Why it matters |
|---|---|---|
License term | Yearly, lifetime | Sets whether a key expires |
Support period | None, 365 days, unlimited | Separates the right to use the product from the right to get help |
Site limit | 1 site, 5 sites, 50 sites | Controls how far one purchase can spread |
Quantity rule | One key per unit, or one key with more site slots | Keeps keys consistent across orders |
Refund rule | Disable the key on a full refund | Decides what happens when money is returned |
Update access | Updates during the term only, or for life | Decides whether an expired key can still update |
You also need:
- A WooCommerce store with at least one product that can be sold as virtual and downloadable.
- A WordPress site to run the license server. It can be the store itself or a separate site.
- Access to your product’s source code, so you can add the license check.
- A staging site, or a payment gateway in test mode, for the first orders.
The pricing model shapes the license types you create when you sell digital product licenses, so settle it early. The article on annual vs lifetime WordPress plugin licensing compares both models.
Three Ways to Sell Digital Product Licenses with WooCommerce
There are three common ways to sell digital product licenses. The right one depends on order volume, technical skill, and how unusual your rules are.
Approach | Works best when | Limits |
|---|---|---|
Manual keys | You make a few sales a month | Keys, refunds, and renewals depend on a person remembering |
Custom code with WooCommerce hooks | You have a developer and unusual rules | You write, test, and maintain every status path and the license server |
A license manager plus a WooCommerce connector | You want standard rules with limited custom work | Edge cases, such as partial refunds, may still need extra handling |
Manual keys
You generate a code in a spreadsheet and send it by email. This works for a handful of orders. It stops working when a refund arrives three months later and nobody remembers which key belongs to which order.
Custom code
A developer can write a license server and connect it to WooCommerce order events, so the store can generate license keys automatically. This gives full control. It also means you maintain the server, the order rules, the update system, and the security of the whole thing. It makes sense when your rules are unusual enough that no existing tool fits.
A license manager with a WooCommerce connector
This is the path the rest of this guide follows. A WooCommerce license manager stores the keys and rules. A connector watches WooCommerce orders and tells the license manager what to do. This is the usual shape of WooCommerce software licensing.
If you are still comparing tools, the article on how to choose a WordPress plugin license manager lists questions to ask. If you sell through Easy Digital Downloads instead, WooCommerce vs Easy Digital Downloads licensing covers the differences.
How Elite Licenser Handles WooCommerce Software Licensing
Elite Licenser is a WordPress plugin that works as a license server. It manages licenses for WordPress plugins and themes, PHP applications, and .NET applications, among other products. Its main modules are:
- Products: the items you license, each with a slug and settings.
- License types: the rules a key carries, such as expiry, support days, and domain limits.
- License list: every issued key, with its status and activation details.
- API list: API keys for other applications, with permissions set per key.
- Product updates: version details that make your product show an update notice, in the same way as a plugin from WordPress.org.
- Email templates and webhooks: editable customer emails, and event data sent to other applications.
The WooCommerce side is handled by the Elite Licenser WooCommerce addon. According to the add-ons documentation, the addon needs the main Elite Licenser plugin to work. Together, the two plugins work as a WooCommerce license manager. The Elite Licenser FAQ answers the question about WooCommerce digital product licensing with a yes, through this addon. The addon can:
- generate a license code for a WooCommerce digital product;
- show the license code in the order details;
- disable a license automatically when an order is refunded, cancelled, or fails.
The addon’s WordPress.org plugin page adds more detail. If you map a WooCommerce product to an Elite Licenser product, the addon can generate license keys automatically when an order comes in, based on the quantity ordered. The Elite Licenser product dropdown also appears on product variations. The changelog lists support for WooCommerce Subscriptions and handling of subscription renewals, and version 2.0 added Remote and Local connection modes. The same page lists WordPress 4.4 or higher and PHP 7.4 or higher as requirements.
What the documentation does not say
The public documentation does not clearly describe how the addon treats partial refunds, chargebacks, or an order that returns from Failed to a paid status. It also does not clearly say which license type a key receives when a product has several variations. Treat these as test cases for your own store, not as promises.
Step-by-Step: Sell Digital Product Licenses with WooCommerce Using Elite Licenser
The steps below follow the official documentation and the addon’s installation notes. The same order of work applies to any WooCommerce software licensing setup that uses a separate license server. Screen labels can change between versions, so compare them with your own admin panel.
Step 1: Install Elite Licenser on your license server
Install and activate the plugin on the WordPress site that will act as your license server. The installation guide lists the steps. You can run the license server on a separate site, which keeps it apart from the store, or on the store itself. The addon supports both a Remote and a Local mode.
The pricing page lists yearly and lifetime plans. A Developer plan covers up to 10 products, and an Agency plan covers unlimited products. Check the page for current prices, because they change during sales.
Step 2: Add your product
In Elite Licenser, open the product list and click Add New. The product documentation lists these fields: product name, slug, Request Encryption, Renew Link, Product Link, Check License & Support Expiry on Update, Encrypt Update Response, and Status.
Three settings need attention:
- Request Encryption. Choose it before you release the product. If you change it later, older versions of your product stop being valid until you update them with a new base license class.
- Renew Link. If you enter a link, your product shows a renew button that sends customers to it. Point it at your renewal page.
- Check License & Support Expiry on Update. When this is on, the license and support period must be valid when the product checks for updates.
Step 3: Create license types
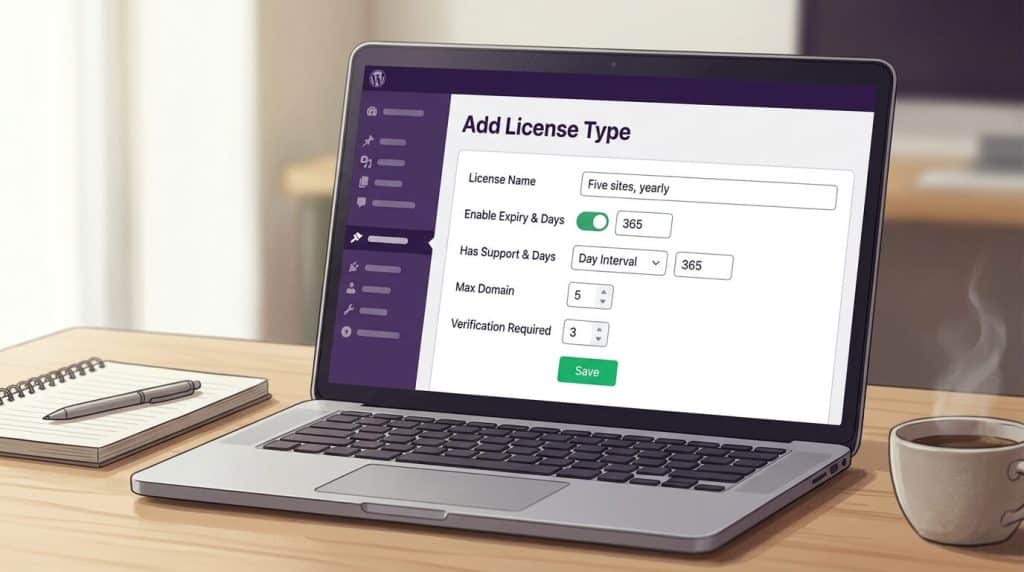
A license type holds the rules. The license type documentation lists five fields: Enable Expiry & Days, Has Support & Days, Extra Param, Max Domain, and Verification Required.
- Enable Expiry & Days: if you enter 30, the license works for 30 days and then expires.
- Has Support & Days: choose No Support, Unlimited, or Day Interval, and enter the number of days for the last option.
- Extra Param: a value passed into the license response, so your product can read it and switch features by plan.
- Max Domain: the number of domains one key can use.
- Verification Required: the number of domains that can activate without manual approval.
The Verification Required field is useful if you want to limit license activations per domain. With Max Domain set to 50 and Verification Required set to 5, the key works on 5 domains without checks. From the sixth domain, you must verify each one by hand. The documentation says this helps block forum sharing.
The table below shows example license types that limit license activations per domain in different ways. The values are examples, not recommendations.
Step 4: Add the license check to your product
Open the product in Elite Licenser and click Generate License Script. Choose the platform that matches your product. For a WordPress plugin or theme, choose WordPress, then continue to download the script. Developers who sell WordPress plugin licenses usually take this path. According to the Elite Licenser FAQ, the WordPress option gives you a full plugin or theme sample that you can install directly. You add your own code to that sample. Sample code is also available for PHP applications, C#.net, and vb.net.
A key that is never checked limits nothing. Decide what the product does when the check fails. Common choices are to lock premium features, stop updates, or show a notice. The check is your product’s job, so this part is your own design.
If you also want to reduce the chance of cracked copies, read how to protect a WordPress plugin from piracy.
Step 5: Create an API key for the store
The WooCommerce addon talks to Elite Licenser through its API. In the API list, add a new API. You can type the key or have one generated. Leave the API IP field blank to allow all IP addresses. You can also limit permissions for each key: add, edit, or view licenses, products, and clients. Start with the permissions you expect the store to need, and confirm them with a test order.
Step 6: Install the WooCommerce addon and connect it
On your WooCommerce store, install and activate the addon. You can download it from the addons page or from the WordPress.org plugin directory. Then follow the installation notes on its plugin page:
- Go to WooCommerce, then Elite Licenser Settings.
- Choose Remote or Local app configuration.
- For a Remote setup, enter the connection details that Elite Licenser provides, such as the API key from Step 5.
- Save the settings and run a test order to confirm the connection works.
Use Remote when Elite Licenser runs on a different site from the store. Use Local when both run on the same WordPress installation.
Step 7: Create the WooCommerce product and link it
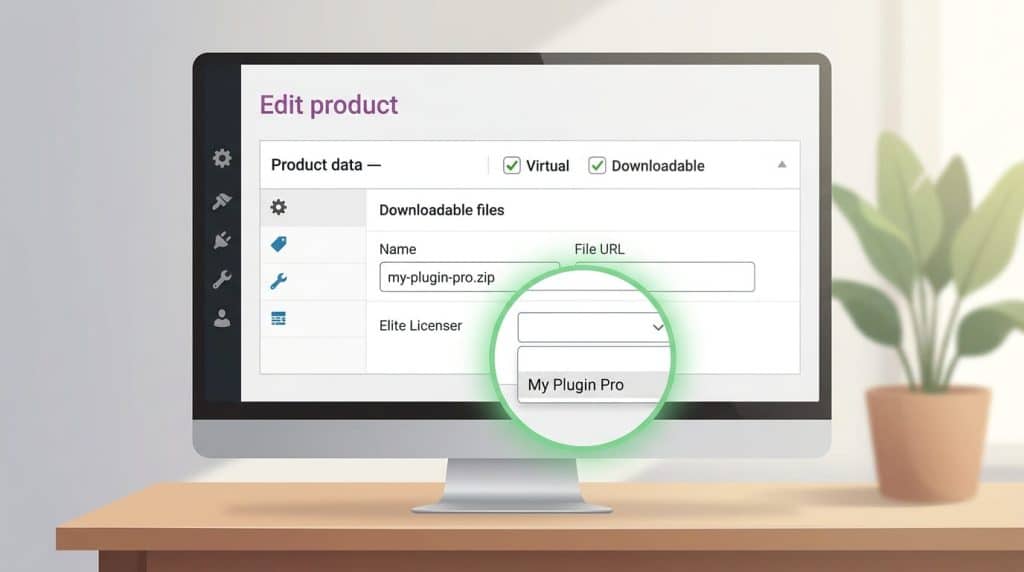
Go to Products, then Add Product, and create a simple product. Tick both Virtual and Downloadable, add the file customers should receive, and set the price. The WooCommerce documentation also lets you set a download limit and a download expiry for the file.
Then find the Elite Licenser dropdown in the product meta box and select the matching Elite Licenser product. This is the link that lets the addon generate license keys automatically when an order for the product comes in. Without it, the order produces a file download and no license key after payment.
For variable products, each variation has the same dropdown. A store could, for example, sell a one-site plan and a five-site plan as two variations of one product. Because the public documentation does not say how license types are assigned per variation, confirm with a test order which type the issued key carries.
Step 8: Set up updates
If your product is a WordPress plugin or theme, you can deliver updates through Elite Licenser. Add the new version details in the product update panel, and your product receives an update notice that looks like a standard WordPress update. Combined with the Check License & Support Expiry on Update setting from Step 2, this lets you limit updates to customers whose license or support period is still valid. Sellers who sell WordPress plugin licenses usually deliver updates through the same server.
Step 9: Test before launch
Use a staging site or your gateway’s test mode. Before you sell digital product licenses to real customers, run each test below and write down the result.
Test | Action | Expected result |
|---|---|---|
Paid order | Place and pay for a test order | A WooCommerce license key appears in the order details |
Quantity | Order two units | Licenses match your quantity rule |
Activation | Enter the key in a test install | The product accepts the key and the domain shows in the license list |
Site limit | Activate on more domains than allowed | The extra activation is refused or flagged for verification |
Full refund | Refund the whole order | The license is disabled |
Cancellation | Cancel an order | The license is disabled |
Failed payment | Use a payment that fails | No active license exists |
Retry | Pay an order that failed earlier | The license becomes active again |
Update | Release a test version | The product shows an update notice |
License key delivery | Open the order details and the customer email | The key is visible where you expect it, or the template needs a change |
The retry and partial refund results matter most, because the documentation does not cover them.
Step 10: Go live and monitor
Once the tests pass, you can sell digital product licenses to real customers. Switch the gateway to live mode and place one low-cost real order. Then check the license list for the new license and its activation details. If another system needs to know about new licenses, such as a membership app, look at webhooks, which send data to other applications when selected events happen. Keep disabled licenses instead of deleting them, so the history stays available for support questions.
What Happens After the Sale: License Key Delivery, Refunds, and Renewals
When you sell digital product licenses, the sale is the first half. The second half is what the store does when the order changes.
License key delivery
The documentation confirms that the addon shows the license code, the WooCommerce license key, in the order details. That is the baseline for license key delivery. A customer should be able to find the license key after payment without writing to support. Check whether the key also appears in your customer email. If it does not, check the email template settings in Elite Licenser, or add a line to the WooCommerce order email that points customers to their order page. Customers also need a place to check expiry dates or move a key to a new domain. The customer license area guide explains the options, and the Elite Member Area addon is built for that purpose. The email template documentation describes what can be edited.
Refunds and cancellations
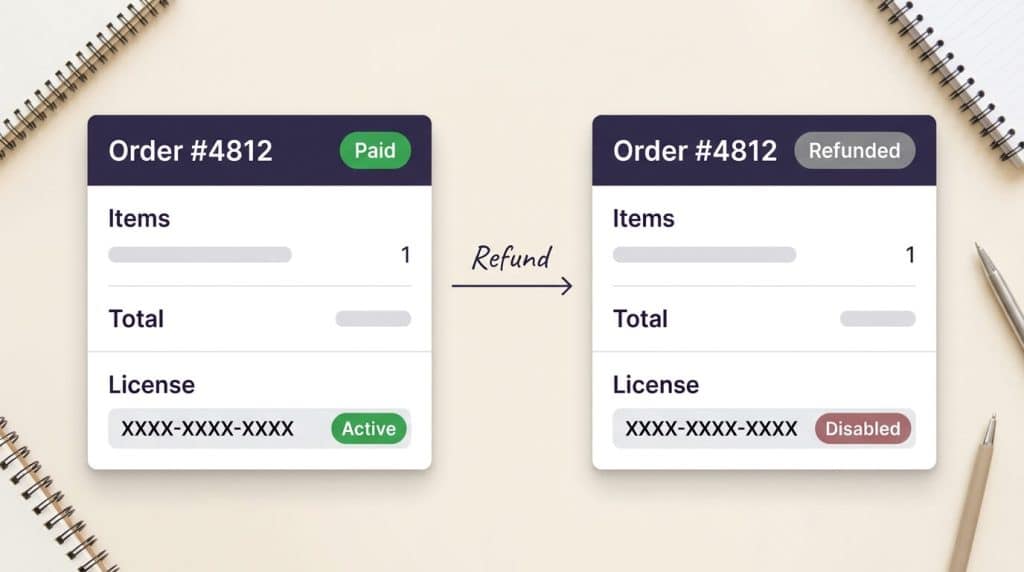
The addon is documented to disable a license after a refund, a cancellation, or a failed order. That covers the standard path, and it means your team does not need to disable a license after a refund by hand in routine cases. WooCommerce applies the Refunded status when the full order value is refunded, while a partial refund normally leaves the order status as it is. A rule based on order status may not notice a partial refund. Write down a policy for partial refunds, and handle them by changing the license status in the license list.
Subscriptions and renewals
The changelog lists WooCommerce Subscriptions support and subscription renewal license handling. If you sell yearly plans through subscriptions, test a renewal and a cancellation before launch. The WooCommerce license automation guide covers the order and subscription statuses in detail.
Common Mistakes to Avoid
These mistakes appear often when a store first starts to sell digital product licenses.
- Treating a download link as a license. A file link controls delivery, not use.
- Issuing a WooCommerce license key before payment. The order can still fail or be cancelled. Issue the license key after payment is confirmed, never before.
- Testing only the successful path. Refunds, cancellations, and retries are where problems appear.
- Changing Request Encryption after release. Older versions of your product stop being valid until they are updated.
- Leaving the site limit open. You can limit license activations per domain with Max Domain, and a key without that limit is easy to share.
- Deleting disabled licenses. You lose the history that helps during disputes.
- Mixing test and live data. Test orders can leave active keys behind.
- Giving the API key every permission. Grant only what the store needs.
- Forgetting the customer message. Explain license key delivery, and tell customers what happens when a license expires or is disabled.
- Skipping the product side. A server full of keys does nothing if the plugin never checks them.
- Relying on staff to disable a license after a refund. Manual steps get skipped in busy weeks, so use the addon’s refund handling and confirm it with a test.
Additional Tips
- Start with one product. Get one product through every test before you sell digital product licenses for the rest.
- Keep the rules consistent. If one product issues one key per unit, issue keys the same way for all products.
- Document the activation steps. Show customers where to paste the key and how to move it to a new domain.
- Plan the expiry behavior. Decide whether an expired license locks features or only stops updates, and write that into your terms.
- Keep your license terms reviewed. A lawyer familiar with digital product licensing should review the wording customers agree to.
- Back up the license server. It holds every key and activation record you have issued.
- Send a short message with the key. A license key after payment is easier to use when the email says where to paste it.
- Review your rules once a year. WooCommerce software licensing rules, such as site limits and support periods, should match your current pricing.
When You May Need Technical or Professional Help
The standard path in this guide covers common cases. If you sell digital product licenses under rules beyond it, ask a developer for help. Typical examples are refund rules by item or amount, custom order statuses, several stores writing to one license server, or gateways that confirm payments late. Applications written in other languages may also need custom code around the API. Elite Licenser has an API and webhooks for custom connections, and its support team can confirm how a specific setup behaves. For the legal wording of your license terms, consult a qualified lawyer.
FAQ: Sell Digital Product Licenses with WooCommerce
It is the practice of attaching license keys and rules to products sold through a WooCommerce store. The store handles the order, and a WooCommerce license manager stores the keys, limits, and expiry dates. The product checks its key against that server.
Not on its own. WooCommerce handles orders and file downloads, but it does not generate software license keys or check them from inside a product. You need a licensing extension or custom code.
To sell digital product licenses this way, create a WooCommerce product that is virtual and downloadable, then connect the store to a license server so it can generate license keys automatically. With Elite Licenser, you add your plugin as a product, create license types, install the WooCommerce addon, and link the WooCommerce product to the Elite Licenser product. Add the generated license check to your plugin code.
The addon is documented to generate a license code for a WooCommerce digital product when an order is placed for a mapped product. The changelog lists handling for the payment complete, processing, and completed order states. Exact timing depends on your payment gateway, so confirm it with a test order.
The documentation says the addon can disable a license after a refund, a cancellation, or a failed order. It does not describe partial refunds, so decide on a policy and test it.
Yes. Each license type has a Max Domain field and a Verification Required field. The first sets the total number of domains. The second sets how many can activate without your manual approval.
The addon shows the license code in the order details. For a separate area where customers can manage licenses, the Elite Member Area addon offers a self-service portal.
No. The Elite Licenser FAQ says it also supports PHP applications and generates sample code for C#.net and vb.net. Its API can be used from other applications as well.
Conclusion
To sell digital product licenses with WooCommerce, you need three connected parts: the store, a license server, and a product that checks its key. WooCommerce covers the first part. A WooCommerce license manager covers the second. Your own code covers the third. Digital product licensing in WooCommerce comes down to keeping those three parts in agreement.
Set your rules first, then build in this order: install the license server, add the product, create license types, add the license check to your code, connect the WooCommerce addon, link the products, and test every order path. Pay close attention to refunds, retries, and partial refunds, since those are the cases the documentation leaves open.
If you use Elite Licenser with its WooCommerce addon, you can generate license keys automatically after payment and disable a license after a refund without manual work. Test the edge cases on a staging site before going live, and use the documentation when you need setup details. Once the setup works, the same steps repeat each time you sell digital product licenses for a new product, whether you sell WordPress plugin licenses, themes, or other software.
Subscribe
To get news about new releases, Updates, Blog Post, Deals and Discounts